Font choices are often overlooked by many and chances are, even you were not paying attention to the type of font you’re reading right now. But ask any good designer or marketer and they’ll tell you how you can change the look, feel, and effectiveness of an entire site simply by using the right fonts. This is where Google Fonts comes in handy, especially if you’re using WordPress.
Changing fonts on your WordPress is not as easy as downloading them to your computer. You’ll also need to convert the font to the right format and then upload it to your host. Not only that, but there is also the issue of testing to make sure it loads properly and looks good on the many different browsers and devices.
It’s fortunate, then, that Google has been making really good progress with Google Fonts, an open-sourced collection of free fonts made by designers from around the world. This means they’re easily accessible by anyone and are free for both personal and commercial use.
Benefits of Using Google Fonts
1. Large collection of over a thousand great-looking fonts, with more being added over time.
2. Easily integrated into WordPress without the need to download or convert the fonts.
3. Google automatically detects the browser and device used and data is sent from its own servers for a fast and seamless experience.
4. Works with CSS – that means you can add adjust the style, add shadows, etc.
5. Free for both personal and commercial use.
Add Google Fonts to Your WordPress
So how exactly do you add Google Fonts to your WordPress site?
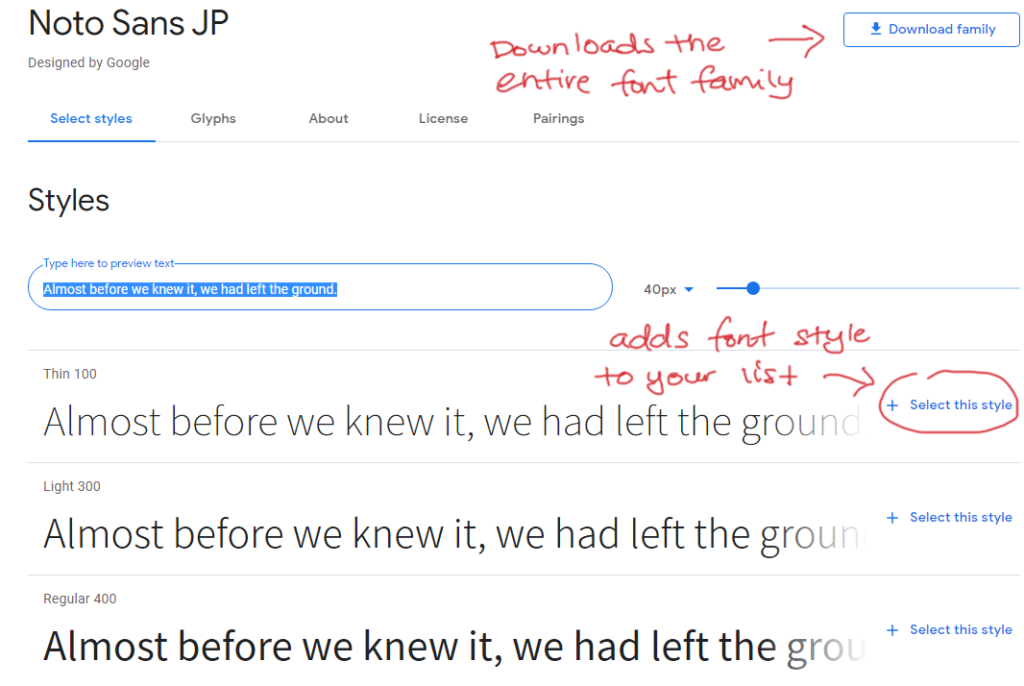
The first step is to obviously go to Google Font and search for the font you want to use. The site streamlined, so it’s easy to navigate and search for the type of font you want. Some fonts only have a single style, while others can have up to over 10 styles. In our example below, I selected the Noto Sans JP font, which comes with 6 styles.
Next to each style is a hyperlink-like button that lets you adds the font to a list which we will touch on in a while. What’s important now is that you can just add any of the fonts and styles you wish to use by clicking on the + Select this style button next to the styles. You can also download the entire font family with all the available styles directly, which you can then install on your computer to use.
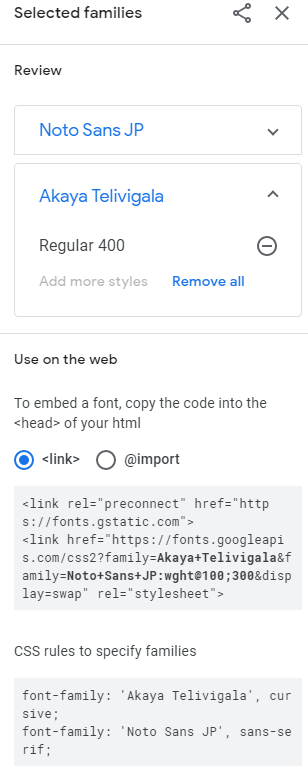
Whenever you add a new style, a new sidebar will slide in from the right. This contains the fonts you’ve added and as you add more, the list grows. Once you’re happy with your selection, you can copy either the <link> or @import embeds, depending on how you plan to implement the fonts to your site.
If you plan to use the <link> option, you just need to copy and paste the code into your WordPress theme’s Header (header.php). You can also opt to copy the @import code and paste it into your CSS file. After that, you’ll need to copy the CSS rules and place them into the elements you wish to use them on, for example, h1, h2, or body.
This method assumes you’re familiar enough with how CSS works since you do need to edit the stylesheet. It gives you really good control over how the fonts are implemented and you can still make additional tweaks directly using CSS. However, you may find that CSS is not your cup of tea and would rather have a more simplified solution.
Use Google Fonts via Plugins
Fortunately, there are now a number of plugins that let you add Google Fonts to your WordPress without a single line of code. There are a number of different plugins around but the one we’ve found to be the easiest to use and is also one we’re using right now is Google Fonts Typography. It lets you access the fonts directly from your editor, giving you surprisingly great control over the fonts you use in your content.
The plugin page can be found here, but you can easily find this from your WordPress plugin page by searching for Google Fonts Typography. Activate the plugin and we’re ready to move on to the next step; searching for the font you want on Google Font. In this example, we’ll go with one of the fonts we’ve chosen previously, Ayaka Telivigala.
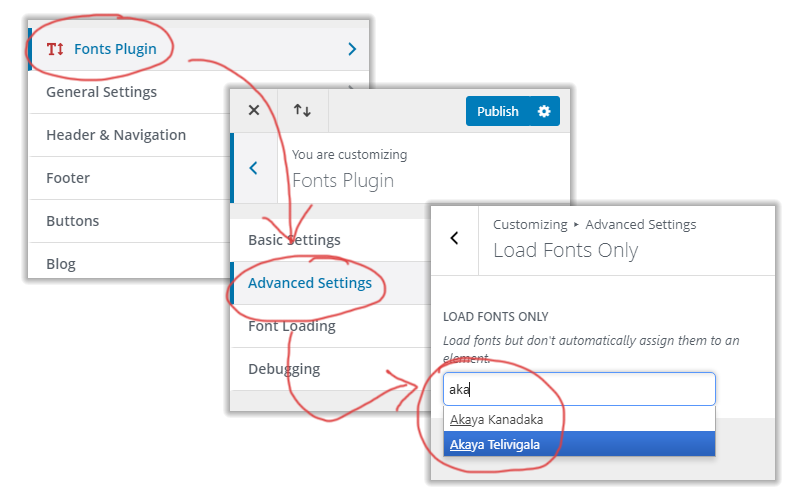
Next, from within your WordPress dashboard, go to Appearance > Customize. From here you will see the Fonts Plugin option at the very top. Select this and then select the Advanced Settings. You can search for the font you want to add from Google Font here. You can also easily remove any added fronts by clicking the “x” next to the font name.
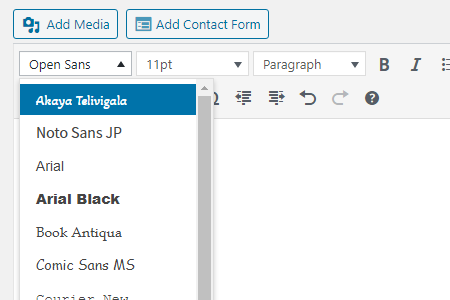
And you’re done! The font will be listed in the drop-down menu in your editor as seen below. This lets you easily choose the font you want to use anywhere on your post.
Congratulations! You’ve successfully added Google Fonts to your WordPress! In fact, you may also have noticed that the font we’ve chosen is also used within this post itself. It’s a simple and efficient way to break up the monotonous paragraphs of text without relying too much on images.


